How To Make An Icon From A Picture
Ever wondered how create an icon from your own images? well scartissue's is going to show you exactly how to do that in this GIMP tutorial.
Getting Started
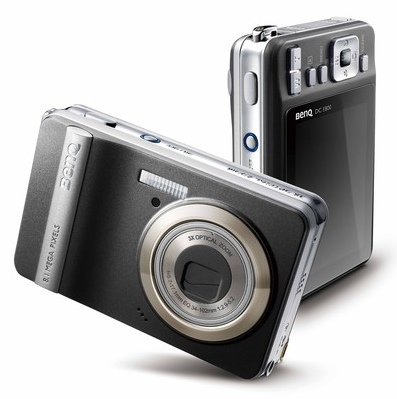
The first thing that must be done is to find a picture. I found one on google with a nice camera. To use it
click here.

Step One
Okay, once you open a picture, right-click on the first layer and select "Add Alpha Channel."
Step Two
Insert a Quick Mask (or press Shift+Q). The screen should turn red. Now, use the eraser tool and erase the red over the camera.
Then press the Quick mask button again (or Shift+Q) and you should see the camera selected.
Step Three
Go to "Select>Invert" (Or press Shift+I). Now everything but the camera should be selected. Press delete. Now you should only see the camera surrounded by black and grey squares.
Step Four
Now go to "Image>Canvas Size..." a pop-up should come up. Next to the "width and height" boxes, click on paper click and make it break. Then change the width and height to a size that shows the camera well. Make sure that the final width and height are the same number.
P.S. don't forget to change the x and y offset as needed.
Step Five
Right-click on the layer now, and select "Layer to Image Size." The layer boundary (the black and yellow line) should now be the same as the canvas.
Step Six
Now you MAY change the colour of the camera to get a better effect. To do this, go to "Color>Colorize... and mess with the settings until the camera looks good.
(These are the settings that I used)
Making It into an Icon
Step One
Whenever you make an icon, if you have it bigger then 256x256, you will have five final layers. What you must first do is copy the first layer.Then select the Scale Tool (or press Shift+T), and shrink the image to 256x256.
Step Two
Now go to "Image>Fit Canvas to Layers" now the canvas should match with the layer boundary.
Step Three
Paste the copied layer and then go to Layer>New Layer..." (or press Shift+Ctrl+N). Then select the Scale Tool again (or press Shift+T). Shrink the pasted layer to 128x128.
Repeat this step three more times, shrinking the image then to 48x48, 32x32, and 16x16.
Step Four
Now look through the layers (you should have five), and see if any of them look blurry. If they do, select the layer and go to "Filters>Enhance>Sharpen..." and sharpen as necessary.
Step Five
Now go to "File>Save As..."(Or press Ctrl+Shift+S) and save it in your desired folder as camera. Don't forget to set the extension as .ico
A pop-up should come up asking whether or not to compress the 256x256 layer. Check the box and click Save. (Compressed PNGs are supported by Vista's, because Vista has a zoom feature. But since Xp doesn't have this feauter, compressing it makes the larger icons work in Vista, and the other icons work in XP.)
AND YOU'RE DONE!
Now you have a very real camera icon!
Subscribe for N10-004 dumps training sessions to guarantee pass 640-760 exam.Also get free download link for the next testking 70-515 exam, after getting success in 70-270 & testking 156-915.71,you can find a wonderful job.
- 363622 reads

